I am, for the most part, a rule follower and a people pleaser. It’s one of the reasons I love baking, which essentially amounts to a set of instructions designed to make something to be shared and bring joy. But if someone recommends something to me, I can be resistant to it for ages.
The farcical element is that once I capitulate and try out the novel, TV show, restaurant or biscuit recipe, I inevitably discover that my tastes are extremely mainstream, and I love whatever it is. It took me years to listen to Taylor Swift before immediately accepting her greatness and becoming her no. 1 fan. There’s no good reason for this. It drives my husband and my best friend mad: their recommendations falling on willfully resistant ears until suddenly one day I am newly evangelical about whatever they’ve been recommending for the past six months. I not infrequently recommend their recommendation back to them.
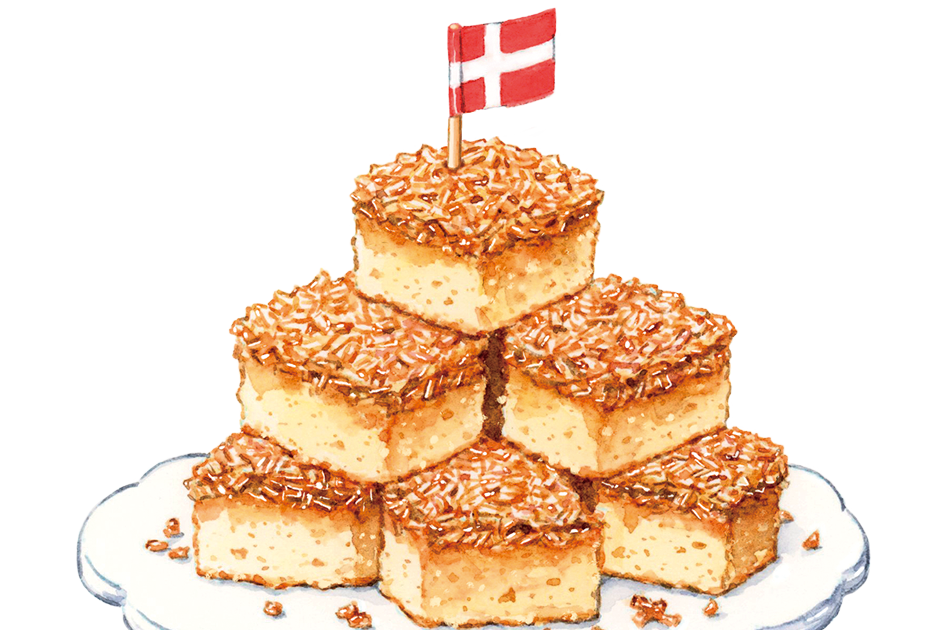
All this is why it’s taken me so long to understand the magic of drømmekage, or Danish dream cake. Danish dream cake is a vanilla sponge with a caramelized coconut layer on top. It sounds great; that’s not the problem. The name is the problem: it tells you how good it is. A dream cake, you say? Don’t threaten me with a good time. Anyway, eventually Danish dream cake came into my life. I’m so glad it did.
Unlike most classic dishes, where the origin is either shrouded in mystery, claimed by a dozen different places or simply an outrageously implausible story, we know exactly where Danish dream cake came from. It originated in the 1960s in the village of Brovst in Jutland. Jytte Andersen, then a young girl, followed her grandmother’s special cake recipe and won a baking competition with the results. The recipe was printed in the town’s cookbook, and soon became a national favorite. Once you’ve tried it, it’s easy to see why.
It’s a two-part bake, with a simple vanilla sponge on the bottom and then, for the final ten minutes of cooking, a coconut-laden butterscotch spooned on top. This caramelizes as it cooks in the oven and then, as the cake cools, the sweet buttery syrup sinks down and penetrates the top of the sponge, as the very top layer crisps. The texture is part flapjack, part syrup sponge, part plush, lush cake, with flavor echoes of treacle tart and Anzac cookies. But it’s also something all of its own. It’s a dream.
Despite the original recipe being committed to paper, there are still small variations found today. A generous amount of topping is essential, not just for the greedier and sweeter-toothed among us, but to ensure that it sinks into the sponge as it cools, rather than wicking away into a mere memory of caramel as it cooks. I like lots and lots of coconut in the topping, which gives a superior flavor and texture.
A simple vanilla sponge on the bottom with a coconut-laden butterscotch spooned on top
A judicious pinch of fine salt takes the edge off the sweetness in both the cake and the topping, and using buttermilk (rather than milk) makes for a tender sponge that is still robust enough to hold the topping halfway through baking. And once the topping is spooned on to the sponge, I favor a slightly longer, hotter bake than many, until the entire surface is bubbling, which ensures that the very top of the cake is completely crisp, almost crackly, once it has cooled.
The cake will keep well for several days, but the coconut topping will soften and mellow; to enjoy it at its absolute peak of crisp caramelization, it’s best eaten on the day of baking. And I cannot possibly tell you how I know this, but if somehow there are still slices of this cake left in your house after a couple of days, and they’re starting to become a little tired or soggy, you can microwave them, drown them in thick cream, and enjoy one of the best puddings of your life – a sort of coconut-drenched steamed pudding. I imagine. I simply wouldn’t know.
Serves: 8
Hands-on time: 20 minutes
Cooks: 30 minutes
For the vanilla sponge
- ¾ cup + 2 teaspoons caster sugar (165g / 5.8 oz)
- 2 large eggs
- 1 tsp vanilla paste
- 1⅓ cups all-purpose flour (165g / 5.8 oz)
- 1 tsp baking powder
- ½ tsp fine salt
- 4 tablespoons (½ stick) unsalted butter, softened (60g / 2.1 oz)
- ⅓ cup + 1 tablespoon buttermilk (100ml / 3.4 fl oz)
For the coconut topping
- 10 tablespoons (1¼ sticks) unsalted butter (140g / 5 oz)
- ⅔ cup packed dark brown sugar (140g / 5 oz)
- ½ tsp fine salt
- ⅓ cup milk (80ml / 2.7 fl oz)
- 1½ cups shredded sweetened coconut (120g / 4.2 oz)
- Line a 20x20cm cake pan with greaseproof paper, and preheat the oven to 390°F / 355°F fan
- Melt the butter and set to one side to cool
- Whisk together the eggs, caster sugar and vanilla in a large bowl till the mixture is pale and thick
- Sift together the flour, baking powder and salt, then fold this through the egg mixture
- Next combine the buttermilk and the butter, and fold this through the mixture too
- Pour into the cake tin, and bake for 20 minutes, until the top is set and beginning to turn golden
- Meanwhile, make the coconut topping: heat together the butter, sugar, salt and milk until the mixture comes to a simmer, then allow to bubble for 2-3 minutes more. Stir through the coconut
- When the cake has baked, spoon the coconut topping on to it, easing it into a level layer. Return to the oven for another ten minutes, by which point the topping should be bubbling across the surface of the cake
- Leave to cool for five minutes, then use a knife to edge the sticky topping away from the sides of the pan while it is still warm. Allow to cool completely, then remove from the pan